Collectd is a system statistics collection daemon. It gathers a lot of information about the system it's running on, and passes it on to a software that can process and visualize that information, e.g. Grafana.
Collectd already brings along a lot of built-in plugins to gather information about the system load, the network traffic, available entropy, various sensors, etc. But sometimes there's a value that you want to log which is not covered by an existing plugin.
There's a generic plugin called Exec, but it has the downside that a new process is spawned for every invocation. That leads to bad performance if a value is queried often.
But there's another way to include custom scripts, which is the Python plugin. In contrast to Exec, it does not spawn a new process for each invocation. Instead, it loads the specified Python script with an embedded interpreter. This makes it more powerful and efficient.
In this post, we'll walk through the process of writing a collectd Python plugin for measuring the Raspberry Pi CPU temperature.
Plugin Structure
A Python plugin can register various callbacks:
- config: You can pass configuration from your collectd.conf to your Python script. In the case of the Raspberry Pi, we could pass in the path to the temperature sensor device.
- init: This function is called once and can be used to initialize resources, e.g. opening a socket.
- read: This function collects the actual data. It is called once per interval. If something goes wrong, the exception the plugin will be skipped for an increasing amount of time until it returns normally again.
- write: This function can be used to process values dispatched by other plugins.
- flush: This function can be used to flush internal caches.
- log: This function can be used to log useful information to the collectd log.
- notification: This function is notified when a previously configured threshold has been exceeded.
- shutdown: The opposite of the init function. Here you can clean up allocated resources, e.g. sockets.
The callbacks can be registered from Python using the register_* function from the collectd package. In our case we just need the config and read callbacks.
Reading the Raspberry Pi CPU Temperature
Getting the current CPU temperature of the Raspberry Pi is simple: We can query the temperature sensor pseudo-file located at /sys/class/thermal/thermal_zone0/temp.
$ cat /sys/class/thermal/thermal_zone0/temp
53692
The value is returned in millidegrees Celsius.
Writing our Script
In our script, we first import the collectd package that allows us to interface with the daemon.
import collectd
Next, we accept some user configuration. The user should be able to configure the path to the temperature device like this:
Path "/sys/class/thermal/thermal_zone0/temp"
The Python callback is a simple function that accepts a Config object.
PATH = '/sys/class/thermal/thermal_zone0/temp'

def config_func(config):
    path_set = False

    for node in config.children:
        key = node.key.lower()
        val = node.values[0]

        if key == 'path':
            global PATH
            PATH = val
            path_set = True
        else:
            collectd.info('cpu_temp plugin: Unknown config key "%s"' % key)

    if path_set:
        collectd.info('cpu_temp plugin: Using overridden path %s' % PATH)
    else:
        collectd.info('cpu_temp plugin: Using default path %s' % PATH)
Since we don't need to allocate any special resources, we don't need an init function. But we need to read data!
def read_func():
    # Read raw value
    with open(PATH, 'rb') as f:
        temp = f.read().strip()

    # Convert to degrees celsius
    deg = float(int(temp)) / 1000

    # Dispatch value to collectd
    val = collectd.Values(type='temperature')
    val.plugin = 'cpu_temp'
    val.dispatch(values=[deg])
Finally, we have to register those two callbacks.
collectd.register_config(config_func)
collectd.register_read(read_func)
For more information about the Python API, please refer to the corresponding man page.
Installing the Plugin
copy the script to your target system. For this example, let's assume that the file is named cpu_temp.py and that it has been copied to /opt/collectd_plugins/. Now you can configure the Python plugin in your collectd.conf:
LoadPlugin python
<Plugin python>
    ModulePath "/opt/collectd_plugins"
    Import "cpu_temp"
    <Module cpu_temp>
        Path "/sys/class/thermal/thermal_zone0/temp"
    </Module>
</Plugin>
Restart collectd and take a look at the log. It should contain the following line:
cpu_temp plugin: Using overridden path /sys/class/thermal/thermal_zone0/temp
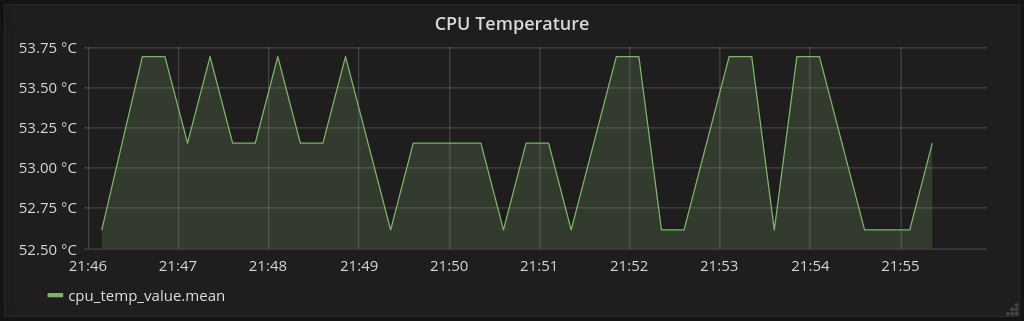
Looks like everything worked perfectly :) Sit back and enjoy your beautiful temperature graphs.
If something goes wrong, add the LogTraces true line to your plugin configuration to be able to see Python stack traces in your log.
Complete Code
You can find the finished plugin source code on Github.